Sunday, July 26, 2015

Shrink Plastic Balloons

I didn't take nearly enough pictures of these as we made them, it was a very hectic week!  It was an end of summer present for our families and it was our biggest session.  It also required a lot of work at home to put together the finished product.  They required daily photo taking, shrinking in oven, printing, hole punching (and if I forgot this vital step back to square one), and then attaching the chain.  Most parents were very appreciative and loved these little gifts! And that is what makes it worth while.

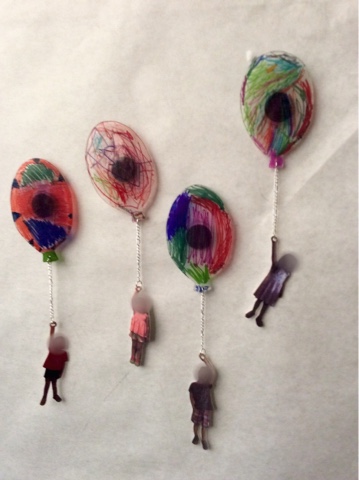
The first part is getting the shrink plastic, or Shinky Dinks, and cutting out a ballon shape.  These ballon where about half a sheet big.  The kids then colored them in.  


Some children just did scribbles and some did very detailed drawings.  It's always important to encourage children when they draw no matter what their ability.  These look beautiful no matter what, so it's always fun to encourage children to explore the medium.  By the way, we used sharpies for drawing, but you can also use colored pencils if you are nervous about young ones and permanent markers!  We actually use sharpies often in our classroom, so children are pretty comfortable with them and understand the rules.


As you can see the trays get marked up quite a bit.

While the children were drawing, I went around and snapped photos of them standing and pretending to hold a balloon.  Lighting was very important I discovered!  Any small amount of backlighting created a very dark picture.  I then used Printshop to crop around their pictures (to save ink), tinted them to about 70%, and printed them out on  special shrink plastic made for injet printers.  I could fit about four kids vertically and a fifth horizontally per page.  Before you cut out the images, make sure you make a hole with a hole puncher first!  Often the hole is bigger than their hand and you won't be able to punch it afterwards.  

Then shrink!  I bake mine at 350 degrees F on parchment paper, colored side up for a couple of minutes.

Add chain from balloon to child's hand, glue gun a magnet on, and voila!  
Cutest magnet ever!  I also wrote "St. Mark's Preschool Summer 2015" on the back of ours.


The children each helped with wrapping their own balloon, and I added the ribbon.  You could tell the kids did the wrapping on the bottom.  


Friday, July 3, 2015

In memory...

These are pictures of a plaque that I made for a tree in front of Holladay Magnet School in Tucson, AZ.  Rafe was a fellow parent who was suddenly hit and killed by a drunk driver while riding his bike near his work at Bioshere 2.  He was a very special person and was doing so much good for our world.  He was taken away too soon, it's all just so very sad.


Shrinky Dink Necklaces

I have a day off, so I thought I would place around with shrink plastic.  Here is what I made today!


The last one is actually a memento for an alter for a friend that passed away.  He was a marine biologist and was especially found of the octopus.  His wife told me that he always likes when the animal prevails over mankind.  Which is what is happening here.

And since life is a circle, I will close with this necklace.  In celebration of a new beautiful being that was born, named Juniper.


Laura Numeroff

Here are some of the crafts that I made with the afternoon class around children's book author Laura Numeroff.  She is know best for her If you Give a Mouse a Cookie collection.

We mostly centered around Give a Pig a Party.  Everyone needs balloons at their party, even a pig.  The also children helped give the pig a party dress, which is a large coffee filter decorated with watercolors.

Our balloons are aluminum foil, painted on with Biocolor.


We also made cupcakes for our party, because who doesn't love a cupcake?  The kids had so much fun making these, but warning they take at least 3 days to dry!  The puffy paint is made with equal parts glue and shaving cream.


As you can see our poor pig lost all but one of her balloons!  Packaging tape doesn't stick to the semi-gloss paint on our walls.  But she has lots of cupcakes, so she's good.


Tuesday, June 23, 2015

Collage

Our second week of summer session was based on collage and books that are illustrated through collage.  Eric Carle, Leo Lionni, Lois Ehlert, etc.

Here are some of the art projects we did in the afternoon.

Hungry Caterpillar fingerprint paintings. These are mini canvases on mini easels.  I used Biolocolor as paint.  The children used their fingers to make the caterpillars, then when they were dry they added the details with sharpie.


Spray art.  Mister Seahorse was cut out and the children sprayed him with watercolors.  This was a very popular activity and great to strengthen their finger muscles.  It was also very messy! 


White crayon resist rooster, from Rooster's Off to See the World by Eric Carle.


Color changing chameleon.  Kids painted paper plates using different colors.  Then we placed another plate on top with chameleon cut out and fastened it in the middle.  When you turn the plate the chameleon changes colors.


 Boat collage.  This was a multi step process.  But the outcome was beautiful!

First we painted large pieces of paper blues and green using different items, scrapers, brushes, anything we found.


Then we ripper them on the long side.


The next day we painted the background and collaged the boat whith shells.
The background was painted with yellow and orange watercolors.


The following day we assembled our collages.  We put the sea down first then placed the boats, sails, and moon.  We talked about the different parts of the boat as we glued it down.  It would be fun to get more words and dictate a story about were they were sailing.