Friday, January 16, 2015

Watercolors with salt

These had three basic directions.

1) Squeeze.  Squeeze the glue onto the cardboard.

2) Shake.  Shake the salt shaker and cover the glue with salt.

3) Drip. This is the hardest part, because it takes control and it's way too tempting to just squirt large amounts of watercolor.  


Paper Plate Swirls

These are really cool and beautiful if you run with them, because they swirl around as you run. Be careful though, the string gets twisted easily and can break.  But if you untwist it every once in a while you should be golden!  

Basically, cut a paper plate in a swirl.  Draw or paint on it.  Then staple one end of it to a string and the other to a large Popsicle stick.
Done.


These really do look beautiful swirling in the air, and the kids loved how they spiraled around as they ran.  

Friday, January 9, 2015

Shaving Cream Snow Creatures

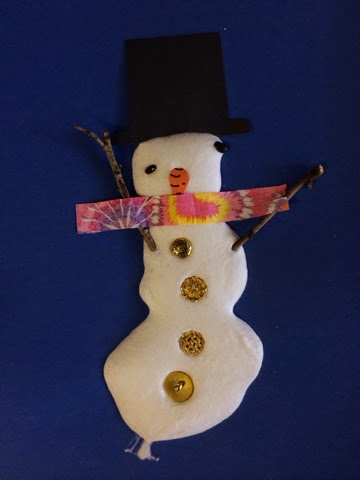
This puffy paint is made from one part shaving cream to one part glue.  The children were encouraged to make any kind of creature that they wanted, but this year they all did snowmen or snow women.  We had a Harry, a Tom, a Darrel and many a Snow Elsa, Olaf or Anna.
We laid out a variety if materials, but also encouraged them to pick anything else they wanted from the collage table.
This is what was created:


The Snow Anna on the left is sitting at a chair with a table eating food, which I thought was very cleaver. 


As I sat with the small group I dictated every child's snow creatures name and what their snow creature was doing.  Then, I put them up on an online art gallery we use.
It takes several days for these to dry!  The first year we did this we hung them up the next day and then discovered that the snow creatures leaked all over the floor.  They also were skinnier after that!

Friday, December 26, 2014

Reggio Based Classrooms

Random pictures of Reggio inspired classrooms.  Most are from St. Mark's Preschool, but others are different schools around Tucson.


Fairy Doors

These were made with Popsicle sticks and old beads that I had laying around my house. I first cut the tops and bottoms off of the Popsicle sticks to make them look more door-like. We glued them on wax paper and I found that it was easiest to have the kids put a line of glue directly between the Popsicle sticks and then push them together.  The children I work with are 3 and 4 years old, so they don't yet have the fine motor skills to place the glue on the side of the stick.  They ended up with glue all over the tops, but we just painted over it.  I would also recommend covering the finished paint with Modge Podge or something similar to help protect it. 


I think the would look adorable around the classroom randomly.  Like little fairies are living there!

Bobcat piñata

At the end of every year we create a piñata of our classroom animal.  The kids are encouraged to use recycled products and really think about the features that animal has.  We often write a list and talk about what we can use to represent those features as we work paper maching our animal.  Some years our animals come out amazing and some years barely recognizable. But it's the collaborative effort that make them all unique and special. 


We then cover the animal with tissue and work on the makings and smaller features, like whiskers and spots.


I really liked how one of the children insisted on fuzzy cheeks!


Whiskers and a nose!


Purple eyebrows?  Why not!


I especially loved the tongue idea.
Because he is hot and we live in the desert, so therefore he must be panting.


Then we hang it up and beat it with a stick.